Creating a Shared Drive
- Marc Miller
- Scott KAsai (Unlicensed)
Contents
Purpose
Best Practices in setting up a Google Shared Drive
Requirements
Required
- UCSB Connect Account
- List of Members for the Shared Drive (Must have UCSB Connect Accounts)
Recommended
- Departmental Functional Account
Process
Create the Shared Drive
First, log onto your UCSB Connect Account on a web browser (Preferably Chrome)
Click on the ![]() icon in the upper right hand corner.
icon in the upper right hand corner.
Click on

Once you are in the Google Drive window, look to the left side and click on Shared Drives.
From there, click on New to get the New Shared Drive window.
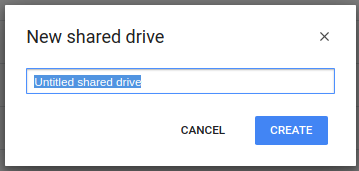
Put in the name of the Shared Drive then click CREATE
We recommend, for ease of identification for ETS to help you better, to use the naming convention of <Department> <Folder Function>.
IE: CSI Daily Reports if the Department was CSI and the Folder was for Daily Reports.
Define the Shared Drive Settings
Click on the ![]() on the right side of the Shared Drive Name to get the following menu
on the right side of the Shared Drive Name to get the following menu
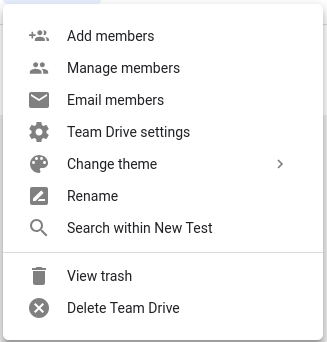
Click on Shared Drive settings
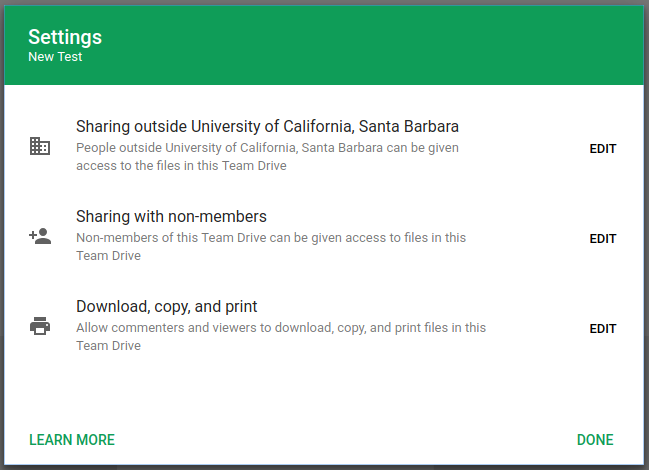
Edit the settings for the Shared Drive with regards to how you want Sharing handled and whether or not you want to allow Download, Copy, Print for Commenters and Viewers.
Refer to Shared Drive Settings on what the settings do.
Important
If the Shared Drive is going to contain FERPA related information (See: FERPA Information for Faculty/Staff), Sharing outside University of California, Santa Barbara should be set to Only people inside University of California, Santa Barbara can be given access to the files in this Shared Drive.
In some cases, you may also want to set Sharing with non-members to Only members of this Shared Drive can access files in this Shared Drive to restrict how far the information can be shared.
Add Members
Click on the ![]() on the right side of the Shared Drive Name to get the following menu
on the right side of the Shared Drive Name to get the following menu
Click on Add members to add members
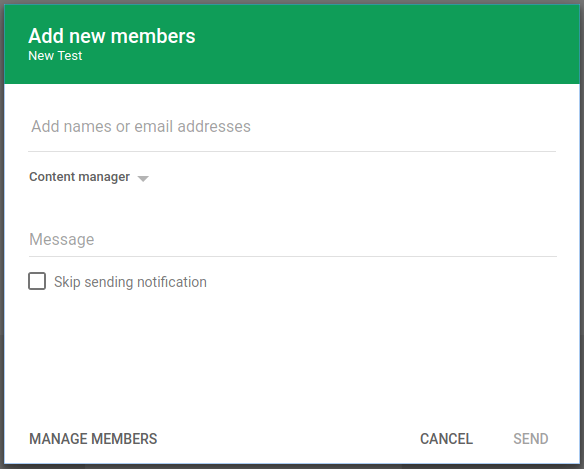
Put in the email addresses of the people with UCSB Connect Accounts that should be a member of the Shared Drive
Where Content Manager is, you can select which Shared Drive Permissions the users you are adding should have.
In the Message area, you can send a message to the people in question so they know what they are being added to.
Alternatively, you can check Skip sending notification if you are simply adding them and will walk them through on how to use Google Shared Drive in person.
Click on SEND to add the members to the Shared Drive.
Repeat this process if there are other Members who have to be set up with different Shared Drive Permissions until you are done.
Finishing Touches
At this point, it is just putting in folders and files into the Shared Drive.