How to use Zoom
Contents
Introduction
A small reminder that the Engineering Computing Infrastructure (ECI) is not directly responsible for the Campus Zoom instance and we can only give Best Effort Support with regards to Zoom. Please also note you DO NOT need to use the campus VPN to use Zoom. For detailed help, please see https://support.zoom.us/hc/en-us or Submit a self-service request to the campus Zoom folks at: ithelp.ucsb.edu then choosing zoom as the help category.
Zoom is a cloud-based platform for video and audio conferencing, mobile collaboration, and simple online meetings. Zoom's web-based conferencing uses high-quality video and audio and is accessible on MacOS, Windows, iOS and Android mobile devices.
Anyone in the world can join a Zoom meeting, but only a host can start/schedule meetings. Use your UCSBnetID and password to sign in to your account to host. https://ucsb.zoom.us/
If you are using a non-UCSB version of Zoom and you wish to host, you will have to use the full client, not the meeting client, and sign in to the UCSB organization using single sign on (SSO)
Please note there are effectively three versions of Zoom:
1) The web browser based version that can only be used to join meetings and does not require anything beyond an invite link: https://ucsb.zoom.us/join
2) The web version with full functionality that only requires you to sign in with your UCSBnetID. https://ucsb.zoom.us/ then click Host a Zoom Meeting
3) The client version that has to be installed by a person with Administrator rights to your computer.
Downloading the Client
Browser based (no hosting meetings, only joining meetings):https://ucsb.zoom.us/download
Client based (choose this if you are the one starting the meeting and inviting others): https://zoom.us/support/download
App based (choose this if you are using an iPad and want to host meetings: https://apps.apple.com/us/app/zoom-cloud-meetings/id546505307
Installing the Client
Windows: https://support.zoom.us/hc/en-us/articles/115004123963-Installing-Zoom-on-Windows-10-Creators-Update
Mac: https://support.zoom.us/hc/en-us/articles/203020795-How-To-Install-on-Mac
Ipad and Ios: https://support.zoom.us/hc/en-us/articles/201362993-Getting-Started-with-iOS
Quickstart Guide
Training Videos are at the bottom of: https://ucsb.zoom.us/
Quickstart PDF: ZoomInstructions.pdf
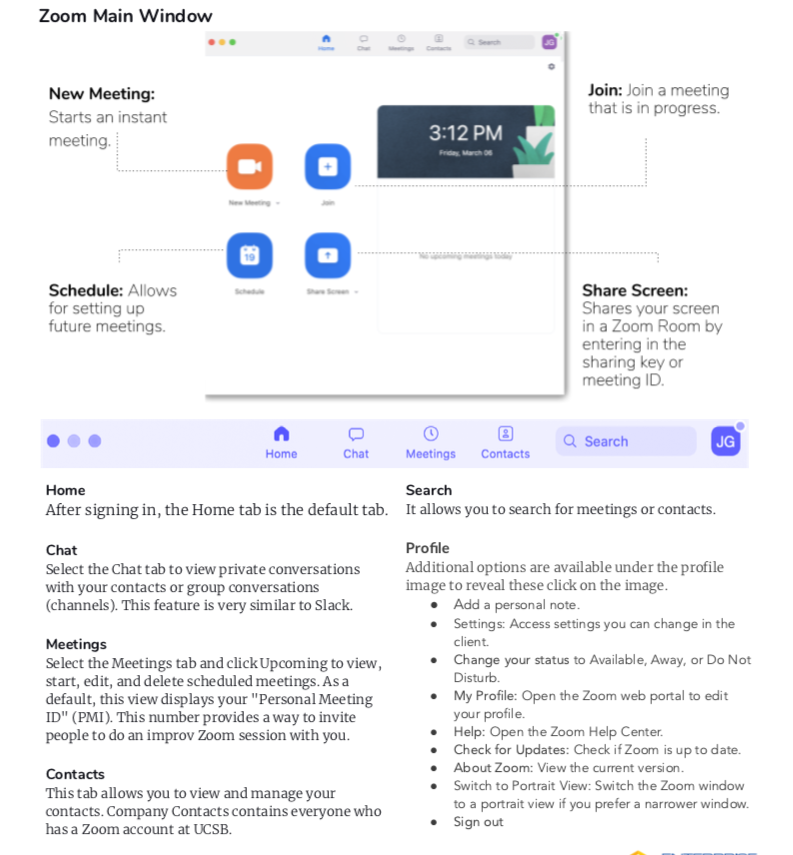
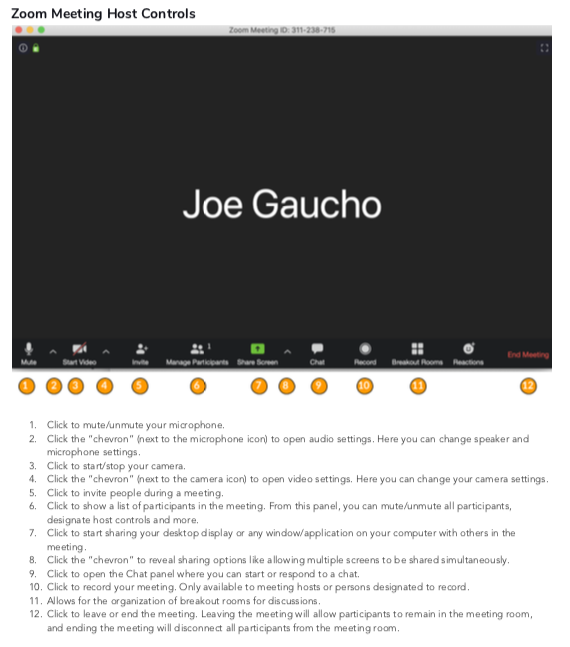
For a comprehensive list and description of controls consult the official Zoom host control guide:
https://support.zoom.us/hc/en-us/articles/201362603-What-Are-the-Host-Controls-
Hosting Securely
We are seeing various reports of uninvited folks crashing Zoom meetings they were not invited to attend. In some cases, these are simply confused people making mistakes, but there are a number of bad actors out there finding their way into legitimate public Zoom meetings and injecting extremely not-safe-for-work content into the call.
These instances are the result of a default Zoom setting that automatically allows anyone to share their screen without the host's permission. Please verify that you have engaged the following settings to prevent such an incident to occur:
Use the Zoom Webinar option during setup, which gives the meeting host(s) full control of the meeting and doesn't allow
- If only the host needs to use screen sharing during a Zoom call, it is best to choose "Host Only" under "Who can share?" rather than "All Participants".
In the Zoom Settings menu you can do the following:
Prevent guests from sharing their screens without permission
Verify that the ”Screen Sharing” option is toggled off (the default is on)
Disable "Join Before Host"
Enable "Co-Host" so others can help moderate when managing large meetings
Disable “Allow Removed Participants to Rejoin” so removed attendees can't rejoin
These settings should be updated before you begin your meeting, but in case you forget you can still access the settings in a meeting by going to the up arrow to the left of the Share Screen icon at the bottom center of your screen and selecting “Advanced Sharing Settings” from the drop down menu.
Related articles

